Custom Roads and Intersections in Modo
From WiCWiki
- by Gozeus
This tutorial shows you how to create roads, footpaths and roadpaint using Modo, then how to import them into your World in Conflict map. It is assumed that you are familiar with both WiCED (World in Conflict Map Editor) and Modo. These techniques can probably be applied to other 3D editing programs as well, provided they can export to the correct lightwave object format (lwo).
Programs you need:
- World in conflict mod tools (WinSDF, Showbox)
- World in conflict map editor (WiCED)
- Modo
- Photoshop (or something that can open dds files)
Note: I started from knowing nothing about 3D editing or using Modo and I'm finding better ways of doing things every day. If you're an expert in this field and you see a better way of doing something, please let me know in the forums or edit this page. After all, this is a wiki ;)
Finding Help in Modo:
Modo has an extremely nice help system. If you're not sure what a command does, hit F1 and click on the button. A help page will come up with some useful info and most come with a video tutorial.
Other Useful Tutorials:
For a shorter tutorial on terrain extensions: Terrain Extensions (Advanced Tutorial)
For an intersection workaround in WiCED: Road intersections (Workaround)
Creating Your First Road
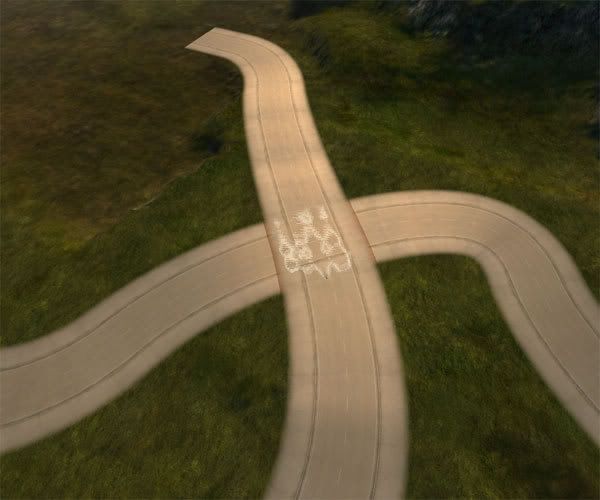
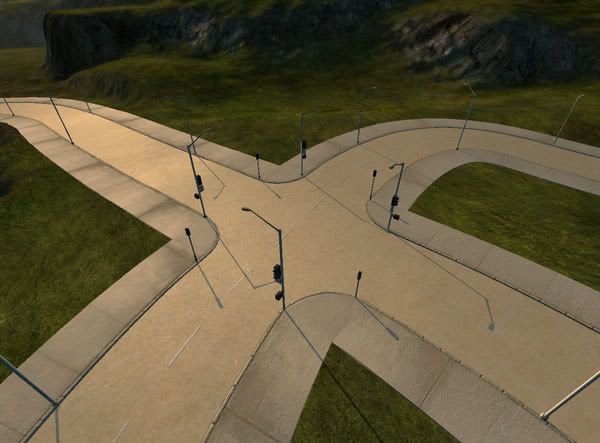
Open up WiCED and start a new map (or use an existing one if you have it). Give the map some terrain that is reasonably flat, then change to object mode and select the road called town_2lane. Place 2 roads that cross over each other similar to this:
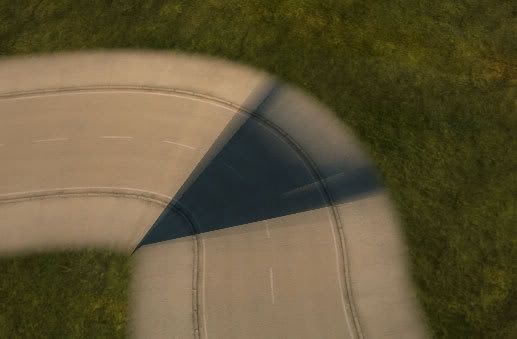
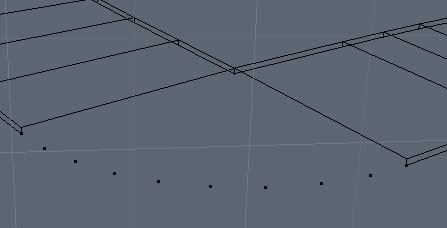
This will form the basis for an intersection between these two roads. To make things easier for later, use the set height tool  to level the intersection, use the smooth tool
  to remove any bumpy ground and make sure the road corners aren’t too tight. You don’t want this:
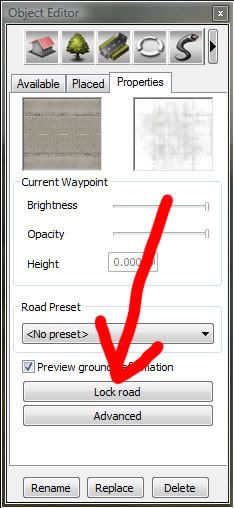
Now lock the roads, export them to lwo (File->Export->LWO->Roads to LWO), and save them somewhere you can remember. Save your map and close WiCED to get back all the system resources it was hogging ;)
Importing Roads to Modo
There should be 3 lwo files in the folder you exported to:
- lockedroad_0.lwo
- lockedroad_1.lwo
- unlockedroads.lwo
The ones we care about are 1 & 2.
Now open Modo and create a new scene calling it roads or something. Import to two lockedroad files (file->import) and find where they are in the scene (View->Fit All, or A).
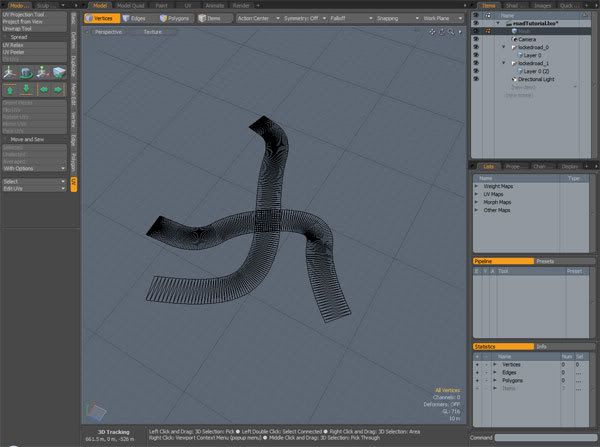
Creating the Road Mesh
By now, there should be 2 road meshes sitting in your scene. We have to make them into a single mesh and remove any overlapping polygons in the intersection area.
Make a new mesh and copy and paste both of the imported roads into it. Keep the imported roads in the scene as a backup, but make them invisible.
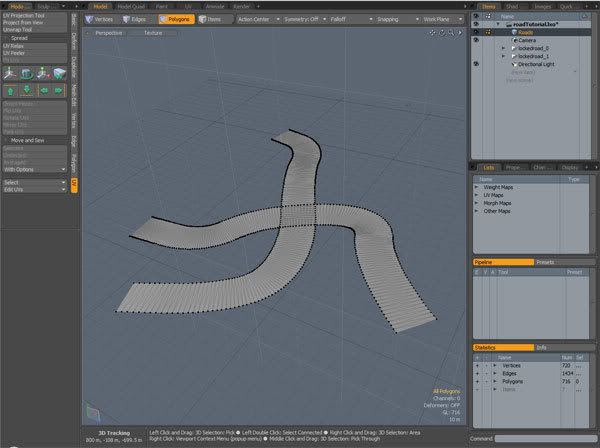
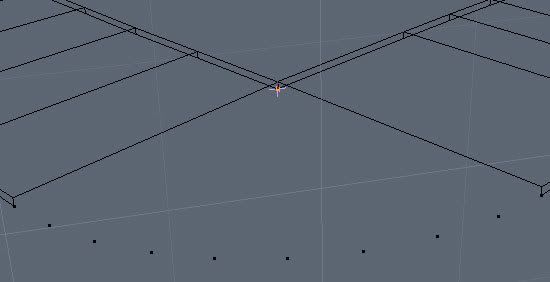
Zoom in on the crossing point, change to polygon mode and delete the polys from one of the roads which are overlapping.

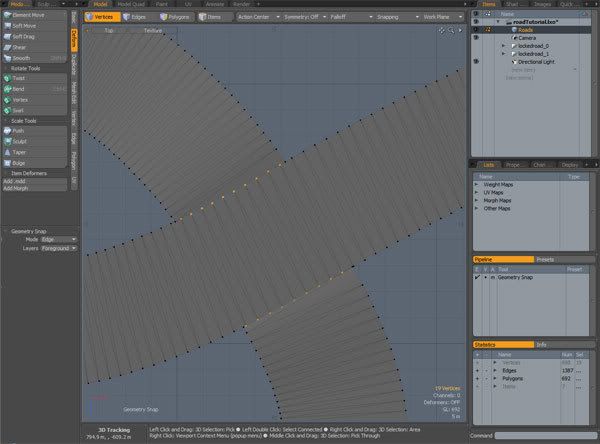
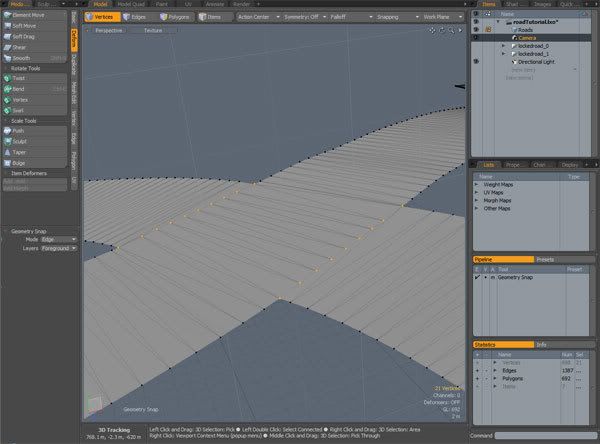
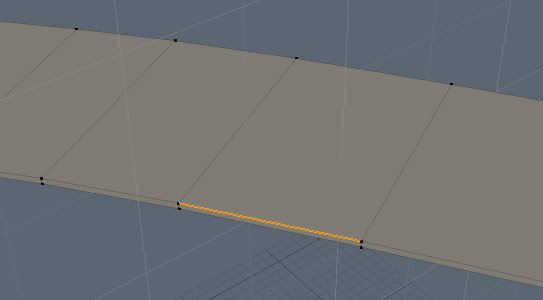
Turn on geometry snap, set to snap to edges in the foreground and change to vertex mode. Grab the vertices on the deleted road and snap them to the edge of the other road, using element move (Modo tools->Deform->Element move, or T).

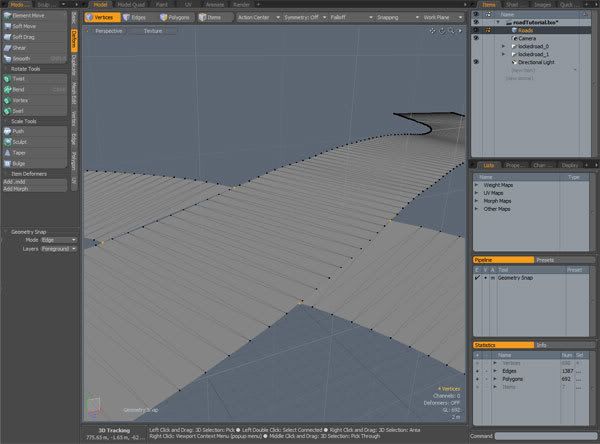
There is going to be a small gap between the roads now, so grab the other roads vertices and snap them to the edge.
So that’s it! Pretty simple for the road mesh, now its time to add a texture.
UV Mapping the Road Mesh
Its time to grab a texture to place on our model, and we might as well grab textures for the footpaths and roadpaint while we’re at it. We’ll be using the road textures from the seaside map, otherwise called ustown4.
Open up WinSDF (in the WIC mod tools) and open wic3.sdf. Scroll down until you find maps/ustown4/roads. Select all of the roads stuff and extract.
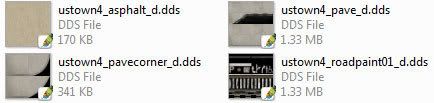
In the folder it was extracted to and copy the files:
- ustown4_asphalt_d.dds,
- ustown4_asphalt_s.dds,
- ustown4_pave_d.dds,
- ustown4_pave_s.dds,
- ustown4_pavecorner_d.dds,
- ustown4_pavecorner_s.dds,
- ustown4_roadpaint01_d.dds,
- ustown4_roadpaint01_s.dds
to the folder where your road meshes are. The textures we’ll be using in Modo are the diffuse ones, designated by the “_d”. They should look like this:
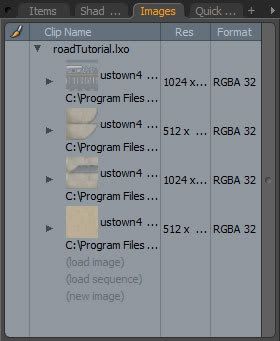
Since Modo can’t open dds files (kinda weird huh?), open the diffuse textures in photoshop and save them as a tga. Now jump back to Modo and under the image tab, load the 4 tga files.
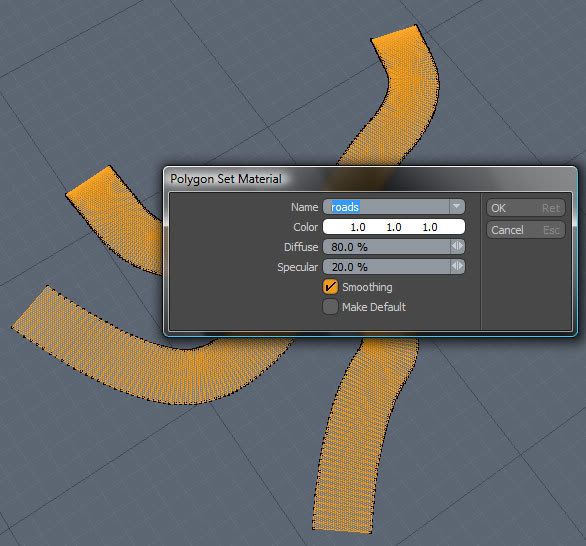
Select the entire road mesh in polygon mode and press ‘m’ to assign a material to those polys. Give it a name and press enter.
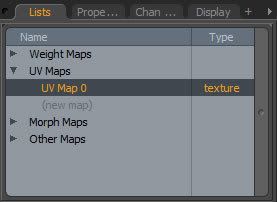
Now drag the texture for the road onto the mesh (ustown4_asphalt_d) to assign this texture to the material. In the lists tab under UV maps, there should be an existing UV map called “UV Map 0”. Rename this to “road”.
The road polys should already be mapped in UV space from the import from WiCED, but we want to make the texture repeat over the entire road mesh so there are no discontinuities where the roads meet.
Open the UV tab and select the entire road mesh.
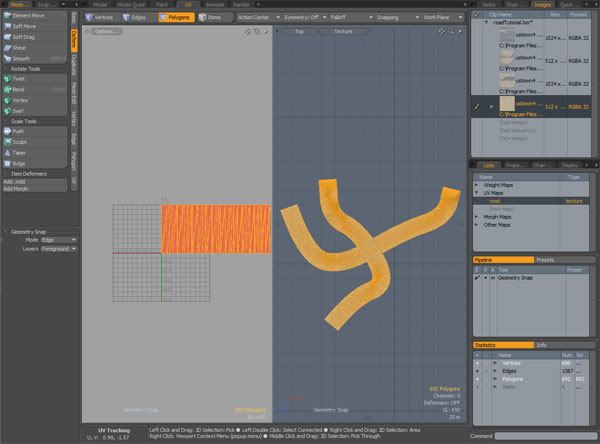
In the 3D viewport in the UV tab, select top view, then use the “Project from view” button (Modo tools->UV->Project from view) to project the road mesh into UV space, from the top down view.
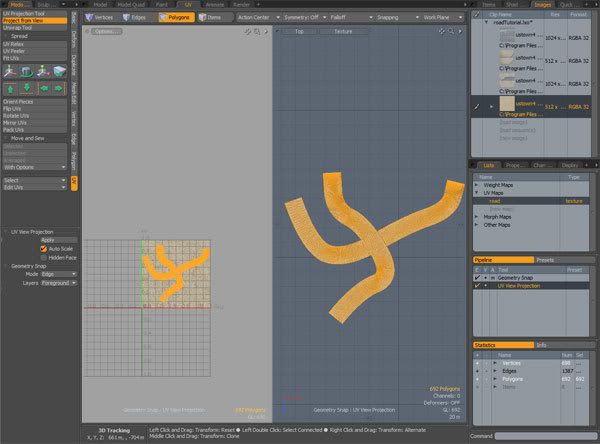
Then scale in UV space until the texture looks nice (i.e. not too pixelated but not obviously repeating)

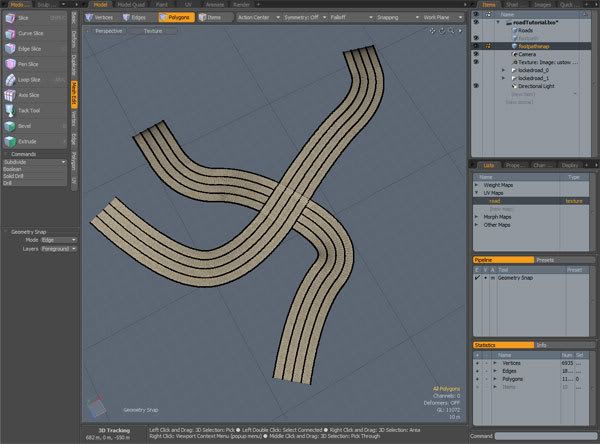
That’s it for the roads, now on to the footpaths.
Creating the Footpath Mesh
The footpath consists of two different meshes: the main footpath and the footpath corners. First we’ll create the main footpath.
Note: it’s possible to create the main footpath and corners in one mesh and use different UV sets for the polygons, but WIC only allows one UV set per mesh (I think).
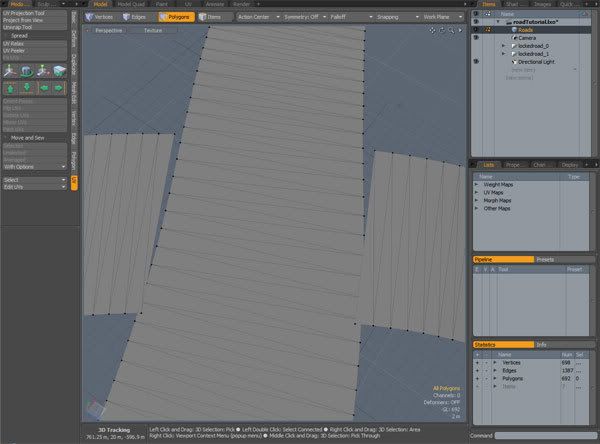
Make two new meshes, one called “footpath” and the other called “footpathsnap”. Copy all of the polygons from the road mesh into footpathsnap and make roads invisible. Use the Subdivide->Faceted (Modo tools->Mesh edit->Subdivide->Faceted) two times. This gives us something to snap to.
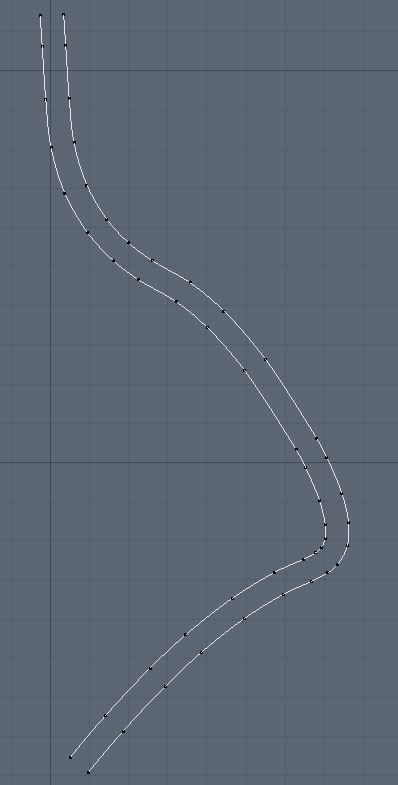
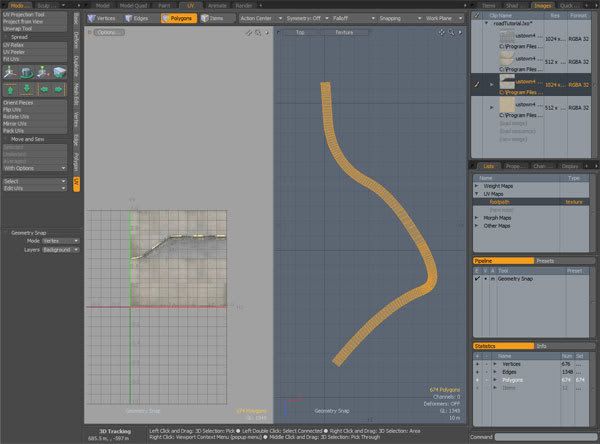
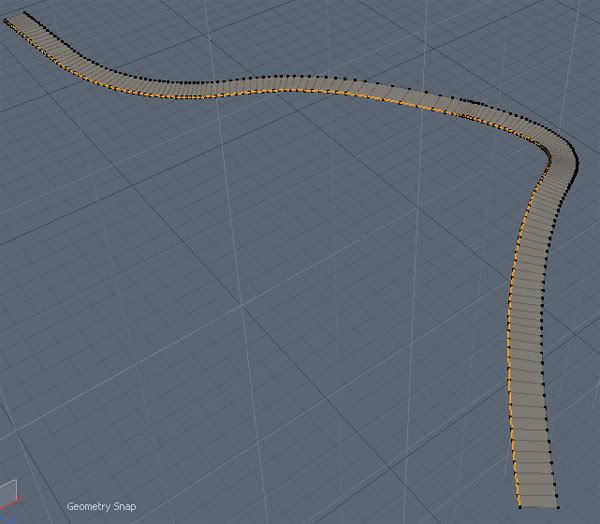
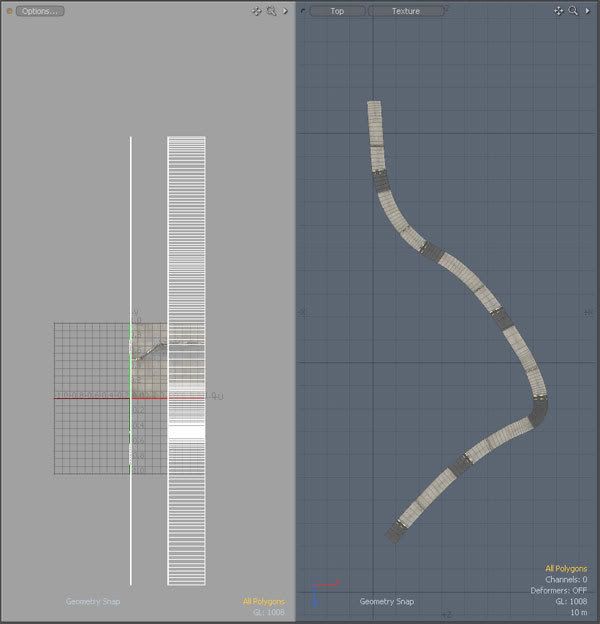
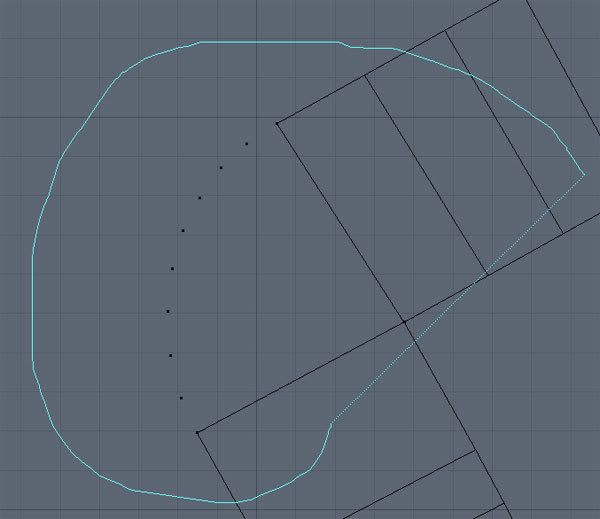
In the footpath mesh, select curve (rightclick Modo tools tab->Viewport settings->curve->curve), turn on geometry snap in vertex mode and starting at one end of the road, create a curve that follows the edge as close as possible.
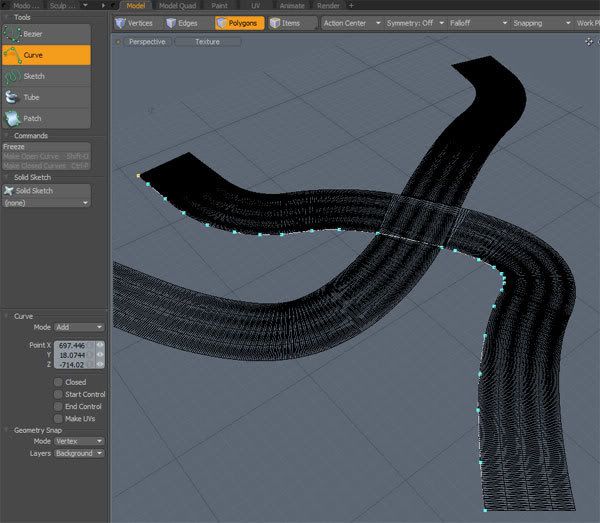
Make a copy of the curve you just created in a new mesh, then select all the vertices and move them one by one, using element move, to the snap point on the road 1/4 of the way in. Try to keep the vertices parallel to the original. You should end up with something like this:
Note: I know this can get horribly tedious, but it’s the only way I’ve found to create a mesh that is really simple to UV map. If experts know how to do this easier, please share!
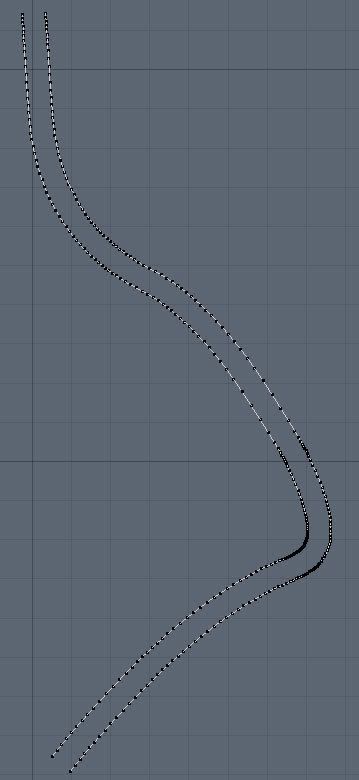
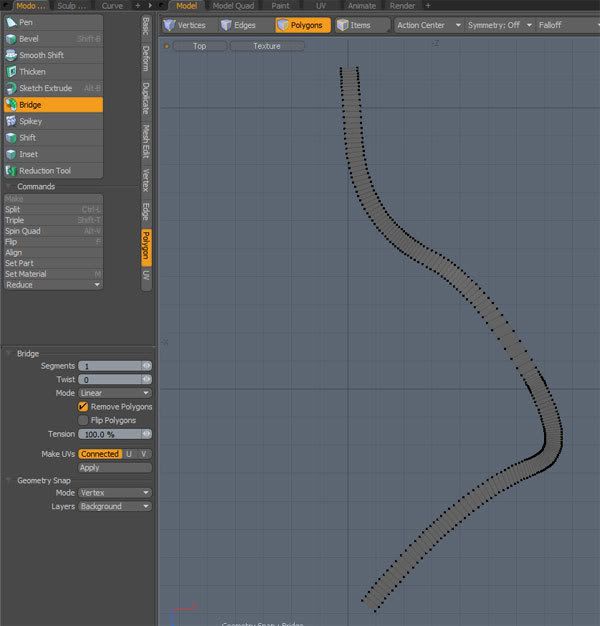
Select both curves and freeze them (Curve->Freeze), then select the frozen curves and bridge them (Modo tools->Polygon->bridge) using 1 segment in linear mode.
Select the mesh and extrude (Modo tools->Mesh Edit->Extrude, or X) by 150mm on the Y axis.

UV Mapping the Footpath
As before, select the mesh and assign a material to it called “footpath”. Make a new UV map (since it doesn’t already have one) and drag the footpath texture (ustown4_pave_d) onto the mesh.
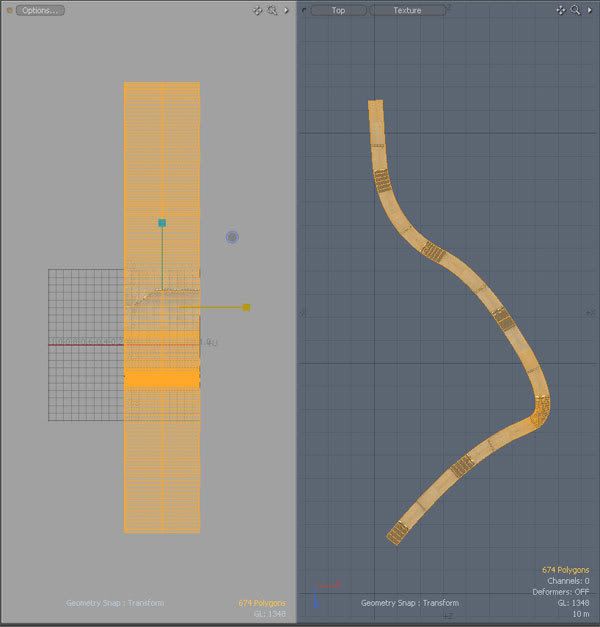
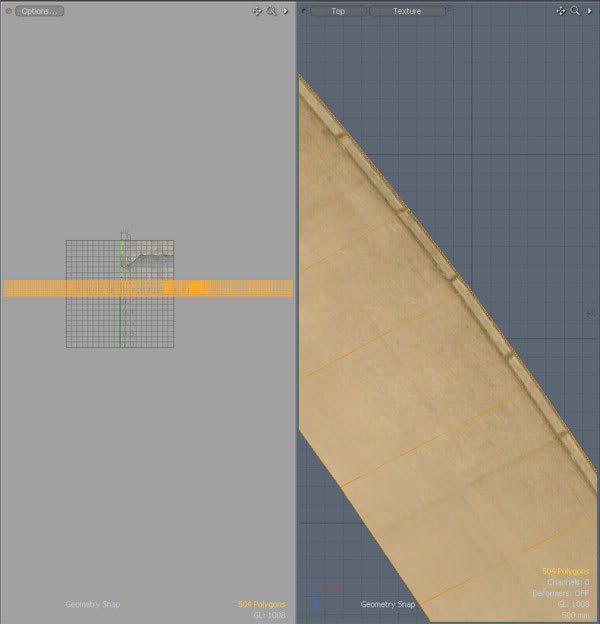
Now here is where Modo makes things easy. Somehow you have to lay out all of your polygons in a straight line in UV space in order to texture the footpath properly. This is where UV peeler is useful. In edge select mode, grab one of the top edges of the footpath, then do a loop select (Select->Loop, or L).
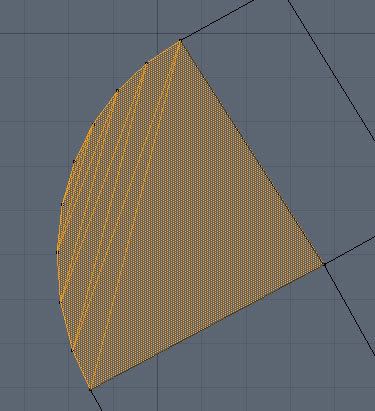
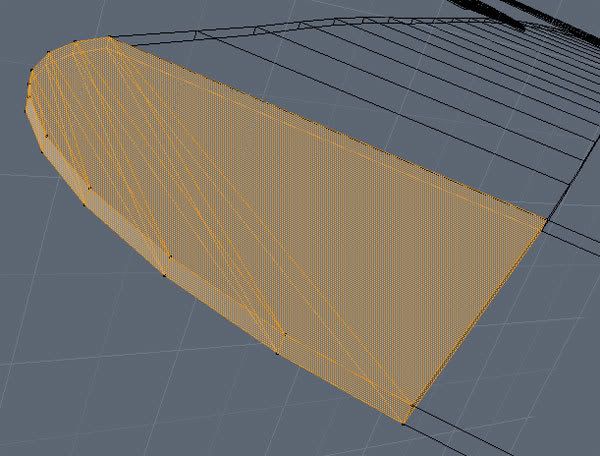
In the UV tab use the UV Peeler (Modo tools->UV->UV Peeler) on the 3D viewport. Scale the polys in UV space so you can see them better, then delete all those polys on the underside of the footpath, as well as the caps at either end. Now rotate the whole lot 90 degrees and line up with the footpath texture, and scale in the horizontal direction until you’re happy.

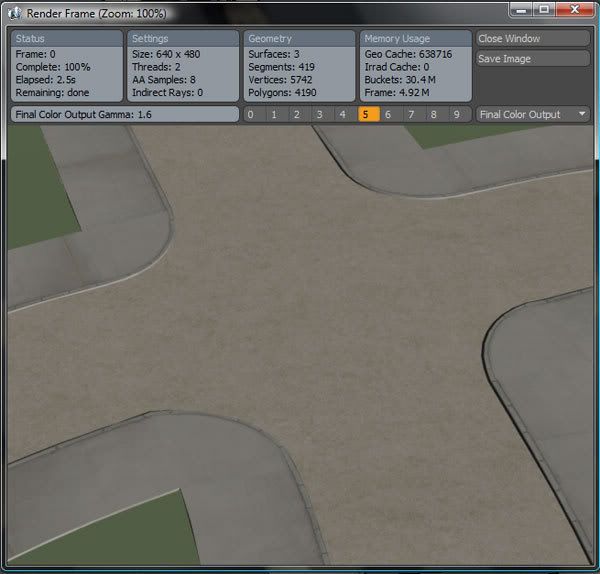
Yeah, so your first footpath is done, now do the rest ;) Once you’re done, do a quick render (f10) and admire your work.

Footpath Corners
Corners are pretty simple to do, and once you’ve done one, you can copy and paste the rest.
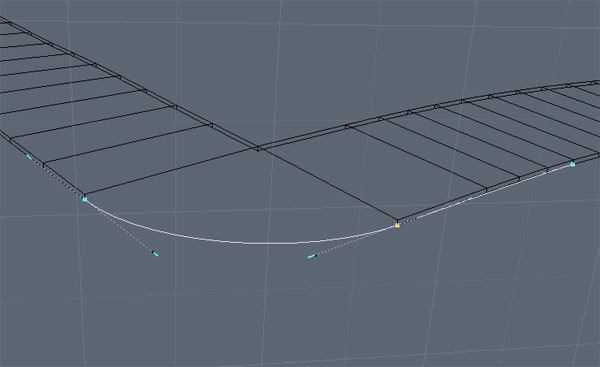
Make a new mesh called “footpath corners” and make all meshes invisible except footpaths. Then go to the curve commands again and select Bezier with vertex snap enabled.
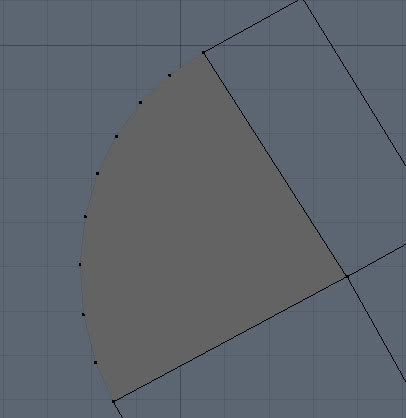
Choose a corner and use the Bezier curve to make something similar as shown. Be sure to snap the handles to the edges of the footpath.
Freeze the curve as before and delete unwanted geometry, then in vertex select mode cut and paste the curve to leave only the vertices. Now get the vertex tool (Modo tools->Vertex->Vertex Tool) and place a vertex on the inside corner.
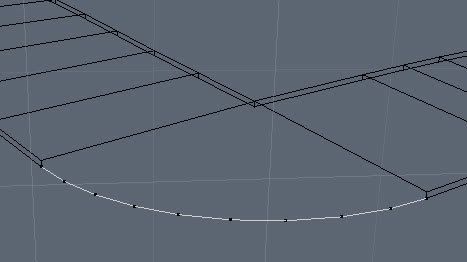
Select the vertices in a clockwise order and make a polygon (Modo tools->Polygon->Make). Since polygons in WIC can only be 3 or 4 vertices, select the polygon and use the triple command (Shift-T).
Extrude the mesh by 150mm in y direction to line up with the footpath.
UV Mapping the Corners
This step is pretty simple. Assign a material and UV map as before and drag the texture (ustown4_pavecorner_d) onto the mesh. Then in the UV tab using the UV projection tool with Atlas projection type, click in the 3D viewport.
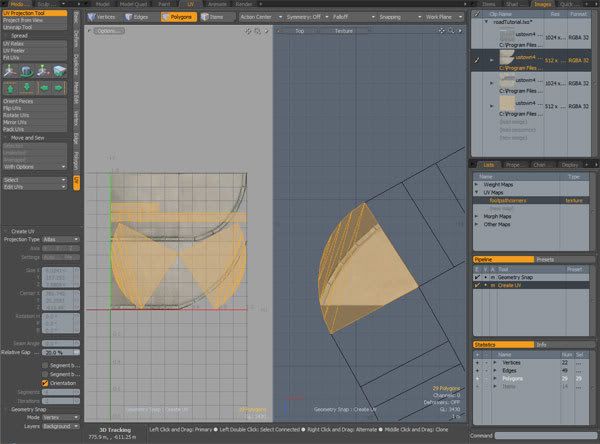
Delete the unwanted polys, then rotate and scale until the corner sits nicely on the texture.
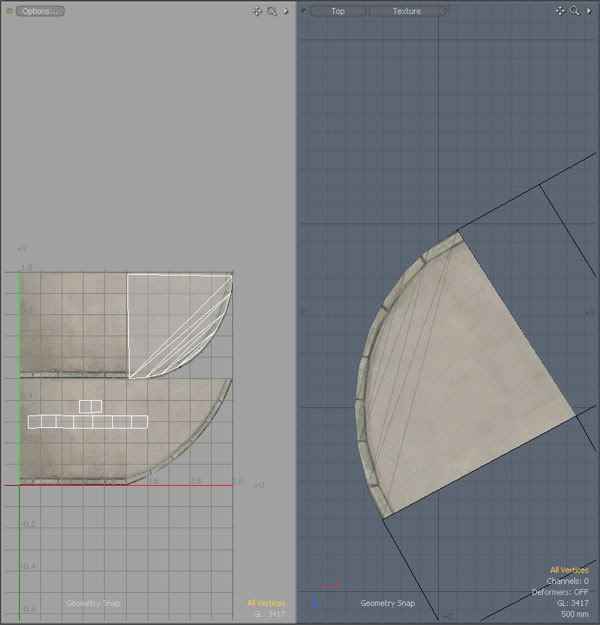
That’s it! Now copy and paste the corner mesh into the remaining 3 footpath intersections, lining up the vertices using element move (but don’t play with the mesh too much or the texture will look horrible).
Time to add some paint to the road now...
Roadpaint Mesh
So this is kind of a weird way of adding paint onto a road, but I think this is the same way it’s done in the maps made by Massive. You have to create a zero thickness mesh that sits about 50mm off the road surface, with the road paint textured on to it. I’ll just show how to do the centreline for this section because you can use exactly the same technique for all other lines.
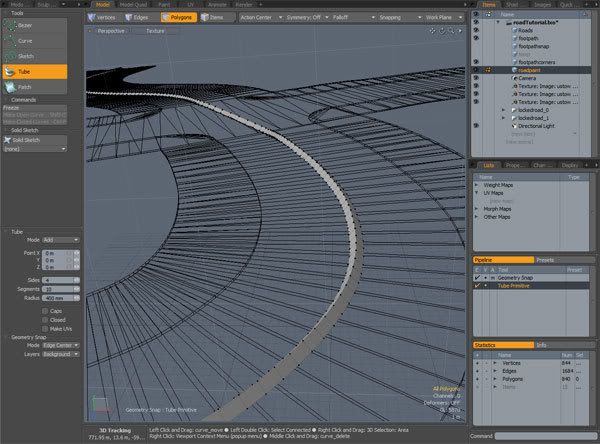
Create a new mesh called “roadpaint” and select the tube tool (Curves->Tube) with settings Sides=4, Segments=10, Radius=400mm, no caps, not closed, don’t make UVs. Set geometry snap to edge center and start to place the tube down the center of the road.
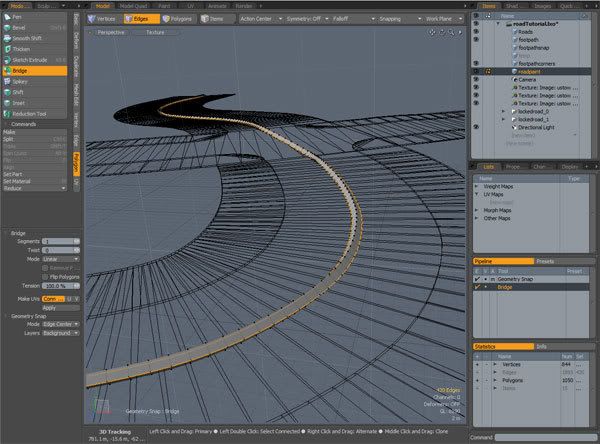
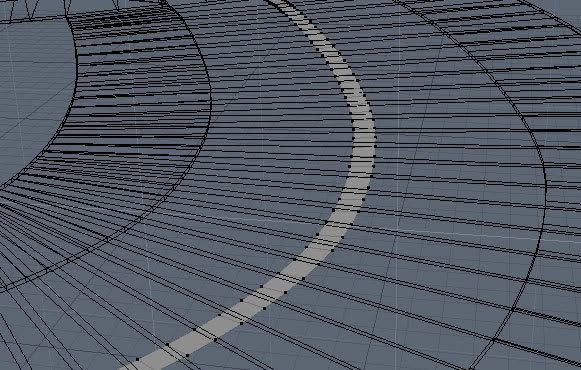
Using edge select mode, select the two edges of the tube that are parallel to the road and bridge them using the polygon bridge command, then delete the tubing. The mesh sometimes ends upside down, so use the flip and align commands if necessary. Now select the mesh and extrude by 50mm in y direction.
UV Mapping the Roadpaint
This is exactly the same method as mapping the main footpaths. Assign a material, UV map and texture (ustown4_roadpaint01_d), then peel the mesh along one of the edges. This time, delete all the polygons apart from the ones facing up, then rotate, move and scale onto the correct line you want to use (using the white dotted line this time).

Rinse and repeat for all the lines you want to draw.

Saving LWO’s as MRB’s
So that’s it for the 3D work. Now we need to import these meshes into Showbox to create an MRB file, ready for importing into WiCED. To make an MRB file, you open an lwo file in Showbox, assign the correct surface, texture the mesh using diffuse, specular and bump textures, then export as an MRB.
In Modo, save each mesh (road, footpath, footpathcorners and roadpaint) as a separate lwo file (I make a new file, drag the mesh into the file, import children and shaders and save as lwo). Now close Modo as you don’t need it anymore.
Note: If you’re like me and you started using the map editor before the mod tools were released, you’ll have to make a copy of the folder where your road meshes/textures are, and paste it into the same relative location in the Mod tools folder ;)
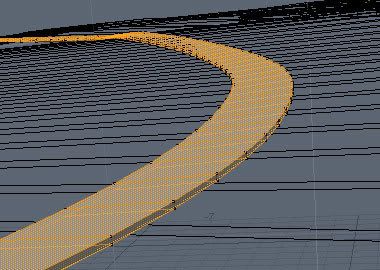
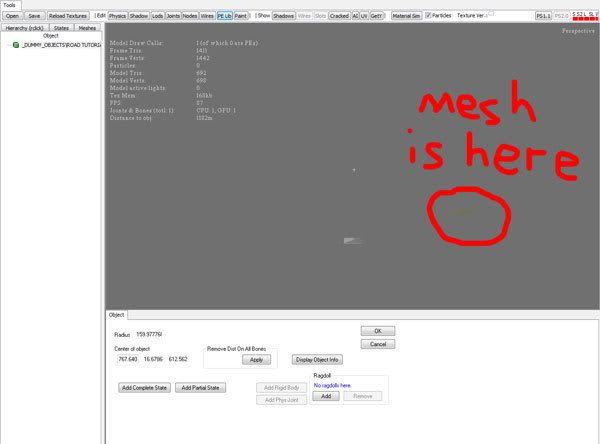
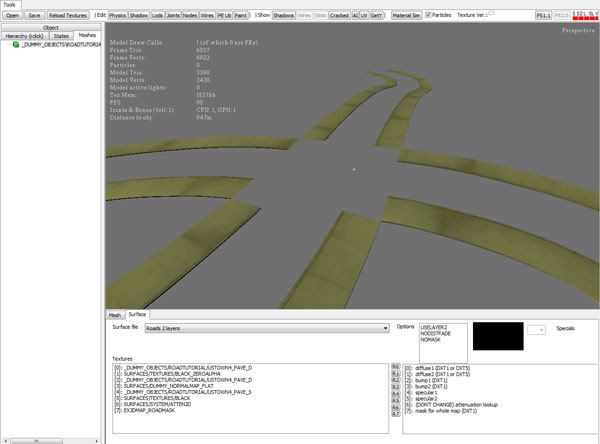
Load up Showbox and open road.lwo. When a window pops up telling you to select from a list, select “(Stand)” and hit OK. This will import your mesh into Showbox. But now you’re asking “where is it?”. Well, I haven’t found a way to zoom all in showbox yet, but if you enable WASD movement (View->WASD Movement), then click the left mouse button in the 3D view and use the WASD keys to go forward and slightly to the left, you should see the road soon enough. If you loose where you are (it’s easy to do), you can restore the camera in the View menu.
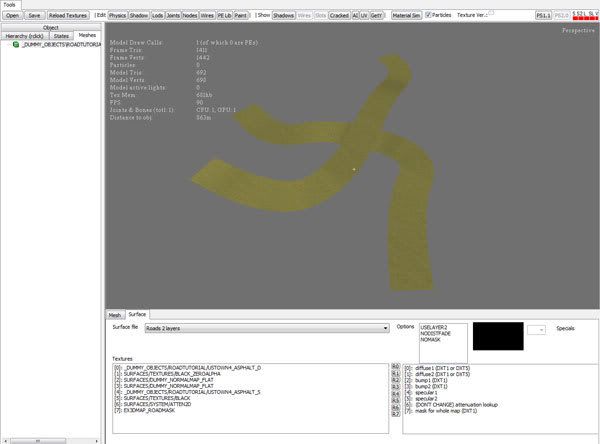
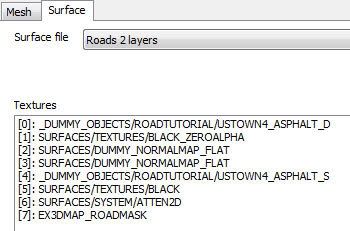
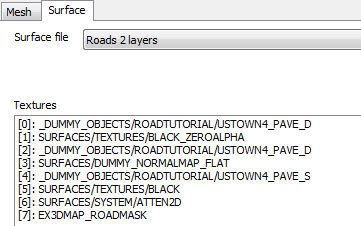
Once you’ve found your road, in the top right of the window click the “Meshes” tab, then down the bottom click the “Surface” tab. There’s a drop down box called “Surface file” and it should have the default “Normalmap diffuse” selected. Click the drop down box and find “Roads 2 layers”. A list of textures will appear. Here is where you select the textures for diffuse, specular and height/normal/bump. For texture [0] choose “ustown4_asphalt_d.dds”, and for texture [4] choose “ustown4_asphalt_s.dds”. That will set the diffuse and specular textures, and leave the bump texture as the default.
Now you need to export the road to an MRB. Go to File->MRB Export and save it somewhere.
The same method is used for the footpath and the footpath corners. Open footpath.lwo, click “meshes” then “surface”, then choose “Roads 2 layers”. This time for texture [0] choose “ustown4_pave_d.dds”, for texture [2] choose “ustown4_pave_d.dds”, and for texture [4] choose “ustown4_pave_s.dds”. This time we are using the diffuse texture as the bump texture. Export to MRB, then do the same for footpathcorners except substitute the pave texture for the pavecorner texture.
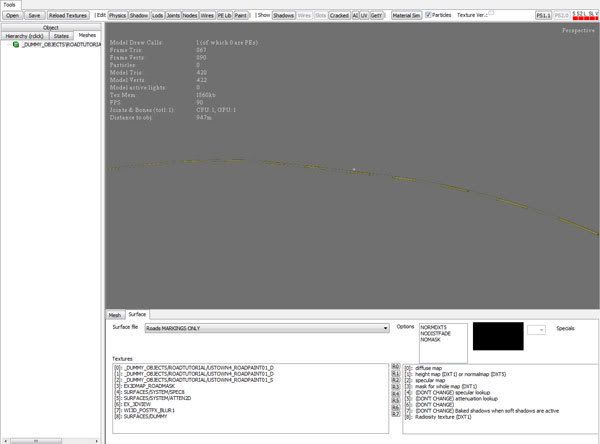
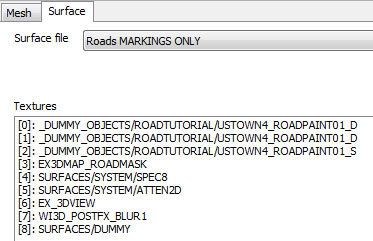
For the roadpaint, open it in Showbox as usual, except this time, instead of choosing “Roads 2 layers”, choose “Roads MARKINGS ONLY”. Then for texture [0] choose “ustown4_roadpaint01_d.dds”, for texture [1] choose “ustown4_roadpaint01_d.dds”, and for texture [2] choose “ustown4_roadpaint01_s.dds”.
Export to MRB and you’re done!
Importing into WiCED
Yeah nearly there! Now to import the MRBs into WiCED.
Close Showbox and grab your MRB files and copy them to the same location in the WiCED folder (if you need to), then open WiCED and load up the map you want the roads imported to. Then go to File->Import->Terrain Extensions and find your MRB files. Import all 4 (roads.mrb, footpath.mrb, footpathcorners.mrb and roadpaint.mrb) and navigate to the place on the map they should be. Add some props to the road to make it look more believable and that’s it! Your first road completed.
Final Bits
Hopefully this tutorial isn't too hard to follow. If there are any questions or comments, please direct them to the forum thread.
Hope to see some awesome roads in the near future.
- Gozeus
